En/2.2/Backup
Contents |
Design of a backup system
Zentyal configuration Backup
Zentyal offers a configuration backup service, to ensure the recovery of a server when a disaster occurs, for example a hard disk failure or a human error while managing configurations.
Backups can be made locally, saving them on the local hard drive of the Zentyal host. After this, it is recommended to save them to an external physical system, so if the machine suffers a failure, you still have access to this data.
It is also possible to make these backups to a remote host, since they are included in the subscription services provided by Zentyal. If your Zentyal server has Professional or Enterprise Subscription, part of the commercial offering of Zentyal, you have the option to remotely backup both your server configuration and the data kept on your server. Likewise, the free Basic Subscription (1) , designed for testing environments, also offers one remote configuration backup. With any of these three options, in case a server failure or human error causes a problem with the server configuration, you can always recover it quickly from the Zentyal repositories in Zentyal Cloud.
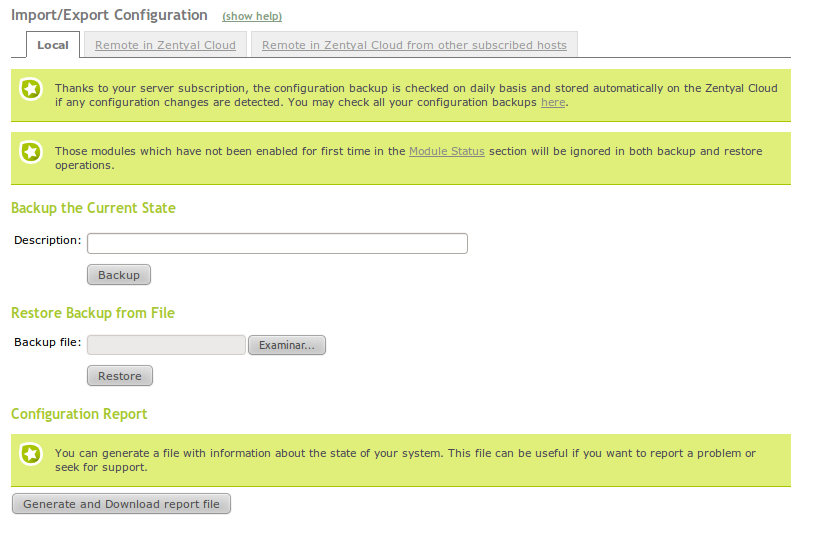
To access the backup options, go to System ‣ Import/Export configuration. You can not backup if there are unsaved changes in the configuration.
Once you have entered the Name for the backup, chosen the type of backup (incremental or full) and clicked on Backup, you will see a window which will show the progress of the different modules until the message Backup successfully completed is displayed
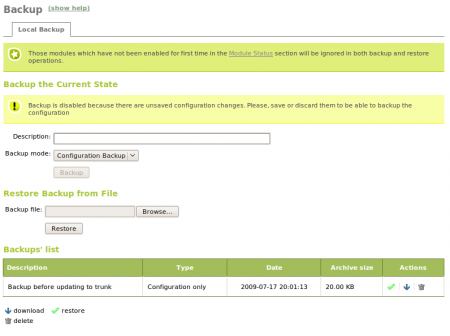
Afterwards, if you return to the former window, you can see in the bottom of the page a Backups list. Using this list you can restore, download to a client disk or delete any of the saved copies. Additionally, you will have data about the creation date and size.
In the Restore backup from a file section you can send a security copy file that you have previously created, for example, associated with a former Zentyal server installation in another host and restore it using Restore. You will be asked for confirmation; simply remember to be careful, as the current configuration will be completely overwritten. The restoration process is similar to the copy; after showing the progress, the user will be notified with a success message if there is no error.
CLI tools for the configuration backup
Data backup configuration in a Zentyal server
You can access the data backup menu going to System ‣ Backup
First of all, you have to decide whether you are going to store your backups locally or remotely. In the latter case, you need to specify which protocol is going to be used to connect the remote server.
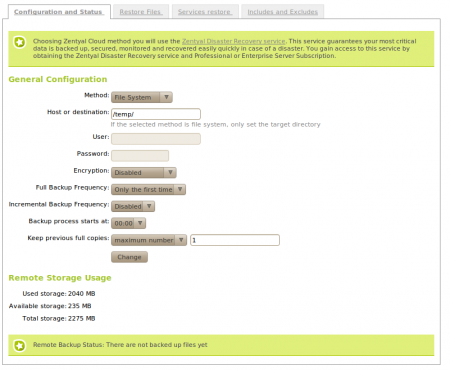
Method:The different supported methods are FTP, Rsync, SCP, Zentyal Cloud, File system. Take into account that depending on the method you choose, you will have to provide more or less information. All the methods except File system use remote servers. If you select FTP, Rsync or SCP, you will have to enter the associated authorisation to connect with the server and the remote server's address.
Zentyal Cloud is the Zentyal Disaster Recovery Service(2) that guarantees that your most critical data is backed up, secured, monitored and recovered quickly and easily in case of a disaster. In order to use this service, you must have a Professional or Enterprise Subscription.
When using SCP, you have to run sudo ssh user@server and accept the server fingerprint in order to add to the list of servers known by SSH. If you do not perform this operation, the backup will not work, because the connection with the server will fail.
Host or destination:
For remote methods you have to enter the remote server name or its IP address with the following format: other.host:port/existing_directory In case you are using File system, you only need the local directory path.
User:User name to authenticate in the remote host.
Password:Password to authenticate in the remote host.
Encryption:You can cypher the data in the backup using a symmetric key that will be entered in the form, or you can use a GPG key already created to perform asymmetric cyphering in your data. The GPG keyring is extracted from ebox user.
Full Backup FrequencyThis parameter is used to determine the frequency for complete backups to be performed. The values are: Only the first time, Daily, Weekly, Twice a month and Monthly. If Weekly, Twice a month or Monthly is selected, you will see a selection option to choose the exact day of the week or month to perform the backup.
If Only the first time is selected, then it is mandatory to set a frequency for incremental backups.
Incremental Backup FrequencyThis value sets the frequency of the incremental copy or disables it.
If the incremental copy is enabled, you can choose a Daily or Weekly frequency. In the latter case, you have to decide the day of the week; either way you have to take into account the chosen frequency which has to be greater than the full backup.
The days that you have scheduled a full backup, Zentyal will not perform any scheduled incremental copy.
Backup process starts atThis field is used to set the time a backup copy is started, for both the full and the incremental backup. It is a good idea to set it to a time frame where no other activities are being performed in the network, because it can consume a lot of upstream bandwidth.
Keep previous full copiesThis value is used to limit the total number of copies that can be stored. You can limit by number or by age.
If you limit by number, only the set number of copies, plus the last complete copy will be stored. If you limit by age, you will only save full copies that are newer than the indicated period.
When a full copy is deleted, all the incremental copies associated with it are also deleted.
Configuration of the directories and files that are saved
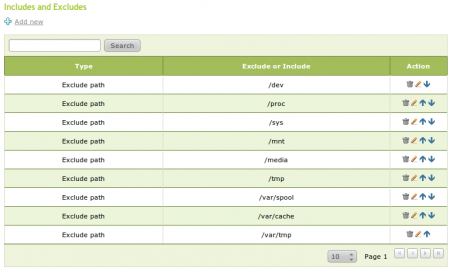
From the Includes and Excludes tab you can configure the specific data you want to backup.
The default configuration will perform a copy of all the file system except the files and directories explicitly excluded. In case you are using the method File system, the destination directory and all its contents will be excluded as well.
You can set path exclusions and exclusions that match a regular expression. Exclusions by regular expression will exclude any path which matches the expression. Any excluded directory will also exclude all its contents.
In order to further refine the backup contents, you can also define inclusions, when the path matches an inclusion before it matches with an exclusion, it will be included in the backup.
The order of application of inclusions and exclusions can be changed using the arrow icons.
The default list of excluded directories is: /mnt, /dev, /media, /sys, /tmp, /var/cache and /proc. It is a bad idea to include any of these directories, because they may cause the backup process to fail.
A full copy of a Zentyal server with all its modules, but without user data will be around 300MB.
Checking the status of the backups
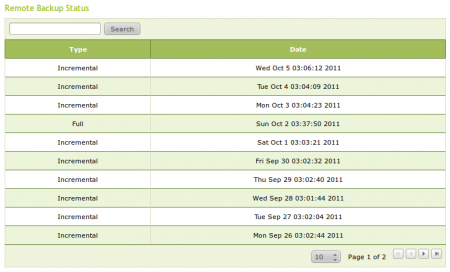
You can check the backups status in the Remote Backup Status section. Within this table, you can see the type of backup; full or incremental and the execution date.
Restore files
There are two ways of restoring a file. Depending on the file size or the directory you want to restore.
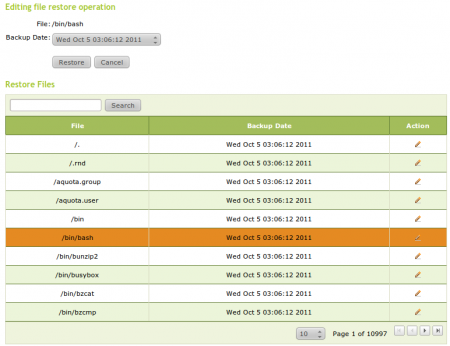
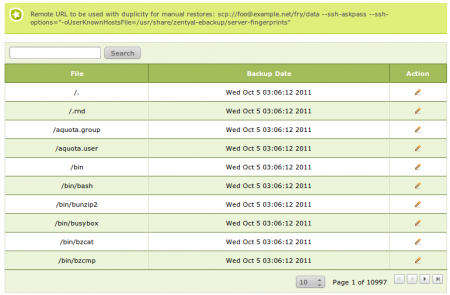
It is possible to restore files directly from Zentyal server's control panel. In the System ‣ Backup ‣ Restore files section you have access to the list of all the files and directories contained in the remote backup, and the dates of the different versions you can restore.
If the path to restore is a directory, all its contents will be restored, including sub-directories.
The file will be restored with its contents on the selected date, if the file is not present in the backup that day. The version found in the former backups will be restored. If there is no copy of the file in any of the versions, you will be notified with an error message.
The files shown in the interface are the ones that are present in the last backup. The files that are stored in former copies, but not in the last one, are not shown, but they can be restored using the command line.
You can use this method with small files. For big files, the process is time consuming and you can not use the Zentyal web interface while the operation is being made. You have to be especially careful with the type of file you are restoring. Normally, it will be safe to restore data files that are not being used by applications at the current time. These data files are located in the directory /home/samba. On the other hand, restoring system file of directories like /lib, /var or /usr while the system is running can be very dangerous. Don't do this unless you are really sure of what you are doing.
The big files and the directories and system files should be restored manually. Depending on the file, you can do it while the system is running. On the other hand, to rescue system directories, use a rescue CD, as explained later.
In any case, you must be familiar with the tool used by this module duplicity(3). The restoration process of a file or directory is very simple. You just execute the following command:
duplicity restore --file-to-restore -t 3D <file or directory to restore> <remote URL and arguments> <destination>rsync algorithm <http://duplicity.nongnu.org/>.
The -t option is used to select the date you want to restore. In this case 3D means three days ago. Using now you can restore the latest copy.
You can obtain <Remote URL and arguments> reading the note that is included above the Restore files section in Zentyal.
For example, if you want to restore the file /home/samba/users/john/balance.odc you will execute the following command:
- duplicity restore --file-to-restore home/samba/users/john/balance.odc scp://backupuser@192.168.122.1 --ssh-askpass --no-encryption /tmp/balance.odc
The command shown above will restore the file in /tmp/balance.odc. If you need to overwrite a file or a directory during a restore operation, you need to add the option --force, otherwise duplicity will refuse to overwrite files.
